Making a Mast-Mount for a GoPro Digital Hero Camera
- Details
- Category: Misc Articles
- Published: 11 September 2009
- Hits: 18102
I've always loved looking at aerial and mast-mount camera shots in the windsurfing mags, and when GoPro introduced their Digital Hero range of wearable waterproof cameras I decided to try taking my own action photos.
The GoPro Digital Hero cameras are available in several different flavours, with varying mounting options as standard depending on what you want to fix them to. All of them use a sealed polycarbonate case with a separate camera module inside. The cases are sealed using an over-centre clamp and are rated at 100’ depth.
I'd originally bought the basic model which is designed to be wrist-mounted using a webbing strap. After a bit of experimenting it was clear that this was never going to be easy or ideal. Then, GoPro introduced a motorsports accessory kit that includes a different version of the case that was designed to be mounted on mountain bikes, helmets or cars. It differs in that instead of having a plastic "buckle" on the base for a wrist strap it has a rigid screw-mounting point for attaching various mounts, swivels, bases and extension arms. I went ahead and bought one of these kits and at the same time bought a seat post mount. I now had the basics for mounting the camera on a variety of rigid structures.
The one thing I didn't have was a way of clamping the camera to the mast. I'd seen a few techniques used to achieve this but in the end I used an inexpensive plastic welding clamp that I bought from a hardware store for around four pounds.
I've described below the way that I modified this and then fitted it all together:
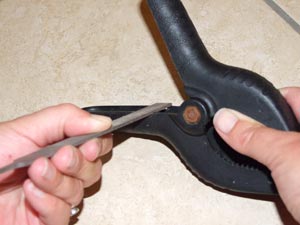
1) Use a file to cut a 15mm x 2mm notch in either side of one of the welding clamp's hollow section "handles"
2) Take the GoPro seat-post mount and reverse the clamping bar so that the clamping aperture is a "U" shape instead of an "O" shape.
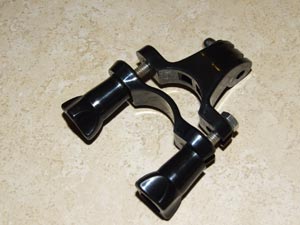
3) Fit a 90-degree extension arm section to the seat-post clamp, then fit the other end to the mounting point on the bottom of the camera case.
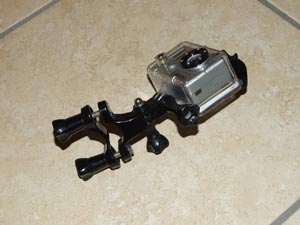
4) Slide the seat-post clamp onto the welding clamp as shown, locating the clamp in the filed-out notches. Tighten the seat-post clamp's thumbwheel screws (don't over-tighten or the clamping bar will deform and may break).
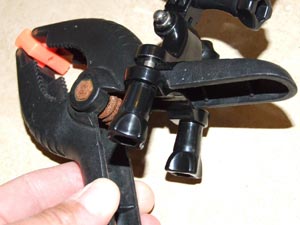
5) You're now ready to fit it all to the mast. Rig the sail as normal then simply fit the welding clamp to the front of the luff-tube approx 3/4 for the way up. I use a scrap of 2mm neoprene under the clamp's jaws to stop the plastic teeth mark the sail's luff tube fabric.
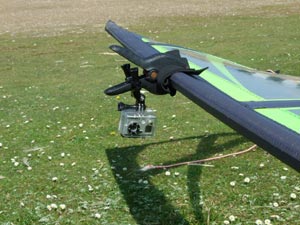
You'll then need to adjust the two thumbscrews on the GoPro parts to get the camera pointing exactly where you want it. In this respect, the new wide-angle lens version of the Digital Hero is much better, as you'll fit a lot more in the shots.
I initially used a shoelace as a safety lanyard, with one end tied around the camera case and the other looped around the webbing strap at the top of the sail's luff tube, but nowadays don't bother; in use it's pretty near impossible for the thing to fall off - I've had all kinds of wipe-outs and catapults and it has never come off, though it might need minor repositioning after a heavy water impact.
6) Follow the camera's instructions to set up either "photo every 5 seconds" mode or "video mode", then off you go! A 2GB SD card will hold hundreds of stills or around 55 mins of video.
The seat-post mount can also be used (without the clamping bar reversed) to mount the camera on a boom. When I do this I add an extra extension arm section from the accessory pack to space it off a bit further from the boom. Again, the wide-angle version will give better results.
Finally, here's an actual photo taken using using the methods and components described here (using the "standard" lens version of the camera.

I bought all of the GoPro parts from www.actioncameras.co.uk
Standard lens 5mp camera and case - £139.99
“Ride Hero” Seat-post mount set - £19.99
Motorsports expansion kit (includes case) - £64.99
Wide-angle “Surf Hero” 5mp camera and case - £159.99
(note that if you buy this unit you won’t need to buy the motorsports expansion kit)
{youtubejw width="400" height="320"}Vebd1gG9Kb8{/youtubejw}
J.C. Baracas July 2009